The Fly - In The Lab

A tense scene between Seth Brundle and Veronica from the 1986 sci-fi horror classic "The Fly".
I saw David Cronenberg's 1986 gooey remake of “The Fly” in the theater and have been haunted by it's horrific images ever since. Though the basic plot elements of the original 1958 film are there, Cronenberg's direction & Jeff Goldblum's acting managed to make the horror of the film NOT the transmuted man/fly lumbering about but more about what was happening to Seth Brundle (Goldberg). Even his last name evokes images of a fairy tale monster a la Beauty and the Beast.
I had been interested for some time in making a diorama showing the “mad lab” where all the horror begins. There are number of Fly figures around (I have a few myself) but only one telepod based on this version of the film was once available from McFarlane Toys (I think). The few that pop up from time to time on eBay were just too expensive and I needed THREE so I had to shelve that project for better days.

A so-called "God shot" of the diorama showing the three telepods and the main characters.
Well, better days manifested themselves in the form of my 3D printer which increasingly has been a life saver for unusual objects as demonstrated by my recent diorama “THEM! - In The Nest”. Click this link to get an idea about what I am talking about: https://www.oneeffgeof.com/448359632 .
I found two nice 3D recipes for telepods on the Thingaverse and CGTrader sites. The better of the two was nicely detailed and included both versions of Seth Brundle (man & half human fly), Veronica (played by Gena Davis) and another included the computer console for the machines. Neither were exactly like those seen in the film but they both were close enough for my needs.
The lab scene I wanted to create would be near the conclusion of the film where Seth (about 7/8 of the way through his horrific transformation) explains his plan off transmuting himself with the pregnant Veronica so they would be “the ultimate family”. To do this would require three telepods.
Two of the telepods needed for this scene were the more detailed versions I intended to print which took roughly 36 hours to print for each pod. The less detailed version took a bit over a day.
The factory brick wall in the rear was made by using a handy computer program I have called 'Model Builder' by Evan Designs. With it, one can printout brick sheets or customized wall treatments with windows, doors or whatever you like. The program comes with many architectural features like cornices, wood trim and so on. You can even import your own photos of objects to use in any size you choose.
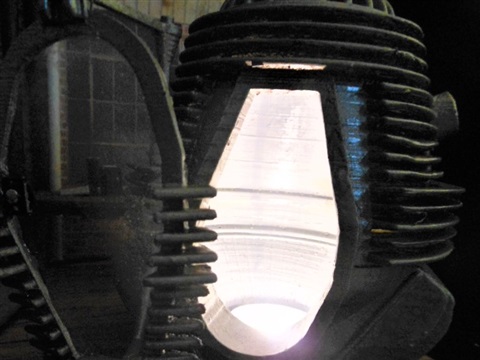
The right side telepod displaying the interior coloration of the telepod in the sequel "The Fly II". Click the picture for a large image.
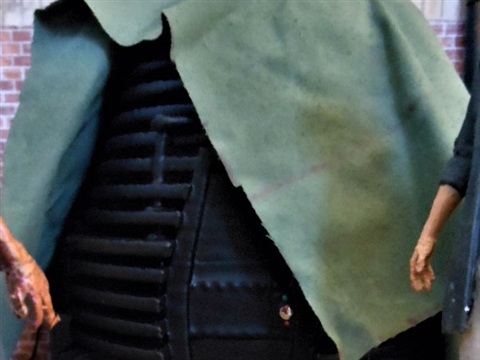
This model is of the prototype telepod as seen in the film needed to carryout the Brundlely's horrific plan for Veronica and her unborn baby. It is covered with a tarp until needed. Click the picture for a large image.
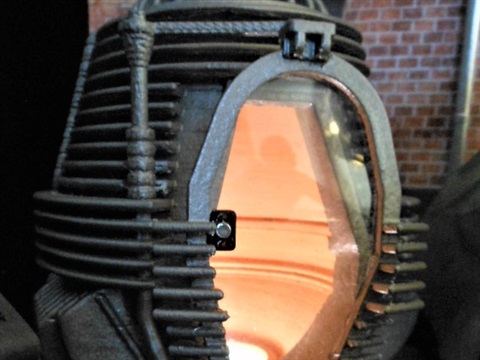
The telepod displaying the original coloration used in the film. Click the picture for a large image.
After I printed out my background designs on full pages of label paper, I applied each sheet to a 9” x 19” sheet of Masonite. I then added a few pipes, a radiator and an electrical junction box to power the pods.
The abandoned factory floor was made by gluing individual wood strips to the back of a shallow 10” x 19” x 1” shadow box that I used to hide the battery and wiring that powered the telepod lighting.
The left and right telepods were lit using 1” in diameter 'accent' LEDs that I purchased online. I used disks of milk carton plastic above them to diffuse the light that comes from the underside of the pods. The telepod on the right had a light blue interior whereas the one of the left was a orange brown tint which closely resemble the coloration of the telepod in “The Fly II”.
The telepod console and stool were 3D printed. I grabbed a screenshot from the movie to get the computer screen which I printed out on glossy photo paper and glued to the console's screen. The small table against the wall was scratch built out of wood.
Though this diorama took me forever (or so it seemed) to construct, I am very pleased with the way it came out. The scale of the scene was about 1:18 and since 95% of the diorama was to be 3D printed, I could scale all the objects to “fit” the scene as well as my wallet. It wouldn't have been possible without my trusty 3D printer as was the case with many elements of some of my other dioramas. 2/6/21

Close up of the console. The computer screen was taken from a screenshot I pulled from the film and printed out on glossy photo paper.
Though this diorama took me forever (or so it seemed) to construct, I am very pleased with the way it came out. The scale of the scene was about 1:18 and since 95% of the diorama was to be 3D printed, I could scale all the objects to “fit” the scene as well as my wallet. It wouldn't have been possible without my trusty 3D printer as was the case with many elements of some of my other dioramas. 2/6/21
.")
A still from the film with Seth Brundle (Jeff Goldberg).
The telepod from the film. Note the 'window' on the lower left of the pod. Click photo for a larger image.

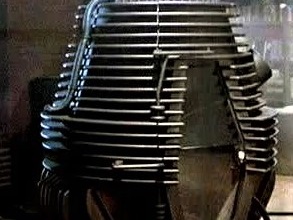
My 3d printed version. Though I didn't design it, I think it looks great sans 'window'. Click photo for a larger image.
Comments
Patrick Schepis
08.02.2021 22:32
Geof, these look fantastic! This is one of my favorite movies and the detail on the computer console is extremely well done!
Latest comments
18.07 | 20:43
Speechless, And I am really speechless.
Incredible work. I am glad we could provide you with a grail
11.07 | 11:41
Great job down to the last detail!
10.07 | 16:36
Thank you, Addis, I estimate it took me around 100 hours to complete.
10.07 | 12:24
Terrific work...must've taken quite a while for you to complete...very good detail!!
Share this page