The THEM! diorama - Drain #267
Often referred to as the Golden Age Of Science Fiction films, the 1950's presented some of the best (and worst) of so-called speculative fiction cinema to date. From 'The Day The Earth Stood Still” (1951) to 'Invasion Of The Saucer Men (1957), one can easily run the gamut from the sublime to the ridiculous with very little effort on the part of the viewer..
Most noteworthy of this period in American cinema was the seemingly endless supply of giant insect movies which, again, had varying degrees of good story telling along with just plain silliness. One only has to see a giant locust walk off a photograph of a skyscraper it is supposedly climbing in the laughable 'Beginning of the End' (1957) to get an idea of what I'm talking about.
'THEM!' (1954), on the other hand, probably presents the best of this sub-genre of science fiction on just about every level. Shot in beautiful black & white, it tells the story of a series of horrific murders which initially seem to be the work of a homicidal maniac only to be revealed about 20 minutes in as the actions of a colony of giant ants, presumably the result of nuclear testing in nearby desert areas the decade before. What helps the story is that the cast and all aspects of the production are obviously taking this piece of work very seriously and it shows. The full scale ants are quite convincing and all the action is 'as shot', with no optical effects The descent into the ant lair to see if they have been all killed by poisonous gas is truly suspenseful and unnerving.
THEM! diorama video
Describing the build up of the THEM! diorama
I think you've probably guessed, I REALLY like this film, hence my latest diorama. As I have done a few times before, it is a collaborative effort between myself and Starling Technologies ( http://www.starling-tech.com/index1.php?id=home) which is my FAVORITE go to source for electronic lighting and sound effects for a number of my scenes. If you've some special effects you'd like to add to your creations to make them stand out from the crowd, you can't go wrong with ST.
I opted to model my favorite scene in the movie where, the James Whitmore character attempts to save the two little boys who are trapped in the ant nest below the streets of Los Angeles. The climatic scene takes place in storm drain #267 which is the title of my diorama.
I started out by purchasing a pair of the giant ant kits from Monsters In Motion for roughly $65.00 each. The kits were bare bones (which is what I wanted) consisting of the ant figure along with a nameplate and nondescript base. There are other giant ant kits out there with more to them such as a desert setting with the ant along with a man figure in a fire proof suit which copies a scene from the film. My ants were well cast and needed a minimal amount of clean up before painting. I used a gloss and flat black color scheme for the insect's abdomen and a high gloss dark reddish orange for the rest of the creature. I painted the under leg 'fur' with a very dark brown (almost black) and dry brushed with gold to bring out the individual 'hairs'.
The squad of 1/32 scale US Army men where a combination of Airfix WWII U.S. Infantry figures (A02703) and the cheap Marx army figures I used to play with as a kid. If painted up carefully, they look as good as their more expensive counterparts. I had to fashion a flame thrower from a soldier holding a tommy gun since the Airfix didn't provide one. I had a pair of back tanks that were about the right scale and made a hose to run from the tommy gun to the back fuel tanks. The flame jetting out of the front of the tommy gun is just some hot glue I ran down a piece of clear plastic sprue. I played with the shape of the hot glue until I was happy with how it looked. I then painted the 'flame' with a base coat of white, followed by dry brushing orange, yellow and reds until I was satisfied with how it looked. I had considered lighting the flame like others have done but decided that though it would have looked great, it would have dominated the scene.
The machine gun & rifle fire are synced with the sound effects (thanks again ST) and came out pretty well. As I have done in the past (see my diorama 'Desperate Measures In A Nazi Lair' elsewhere on this site), I snaked a section of fiber optic up through the soldier's body and laid it down in place of the rifle or tommy gun barrel which I had previously cut away. The other end of the fiber optic strand was attached to the corresponding LED effect on the Starling Tech's lighting board. To make things a bit easier, I carefully drilled a hole down into the LED just stopping before the light source. The hole is about a 1/16th of an inch deep. You just want something the fiber can be inserted into to keep it in place. I then glue it in place with clear Elmer's glue. IMPORTANT: Do NOT use Super Glue or any solvent based glues to affix the fiber optics to the LEDs or to anywhere else for that matter. It makes the fibers extremely brittle!
The US Army Jeep is a 1/32 scale Testor's kit you can pick on eBay. I installed LEDs into the headlights which I fed power to from beneath.
The perimeter work lights in the storm drain construction area are O gauge LED wall lights I picked up on eBay that are wired in series. I realize that series wiring has the possibility of messing things up (if one LED burns out, you lose the whole string) but I was trying to keep the wiring as simple as possible.
The base is where all the 'guts' of the scene are hidden. I used a 16” x 20” wooden plaque I purchased at a local crafts store and added a 1” x 3/8” bead stock around the perimeter capped with a sheet of Masonite. This gives you a nice cavity beneath were you can hide all your wring along with the speaker for the sound effects. I've used this construction technique frequently in previous applications.
The sewer walls are just pieces of florist's foam I cut to shape. I then coated them with something called Liquitex (see my review of this product in the Hints & Tips Section) which becomes ROCK hard when dry. It starts out like toothpaste but can be easily troweled (the look I wanted to simulate was old, weathered concrete) and takes a while to dry so you some time to work with it. Once cured, it can be sanded, drilled, painted, anything and isn't dusty like plaster. I really like this stuff.
As a final touch, I screen captured two scenes from the film. One is a shot looking down the sewer at the distant ant nest. I printed out this shot on photo paper and placed the print inside the tunnel where the ant being 'flamed' is emerging from the tunnel. It's hard to see in my photos here but it looks pretty cool if you peer down the tunnel.
The second screen shot from the film is of the sewer blueprint where the ants have their nest labeled as Sewer Drain #267, I used this as my diorama's title card after tinting it a light blue to simulate what a actual blueprint looks like and printed it out on glossy photopaper.
Anyway, that about it. If you any questions on how I did something, feel free to contact me either in the comments section of this site or by emailing me at oneeffgeof@comcast.net.

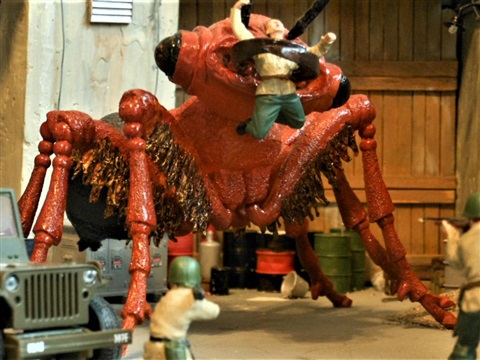
Close up of the James Whitmore character being crushed by one of the giant creatures.
Click on the image ONCE to get a larger view.
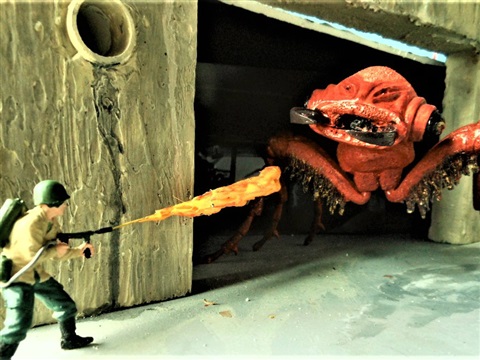
Early test version of the flamethrower shot. Notice that the tunnel construction has a ways to go.
Click on the photo ONCE to get a larger view.
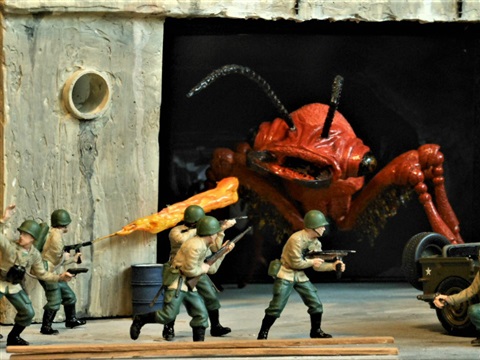
My finished flame thrower scene. More figures and better staging.
Click on the image ONCE to get a larger view.

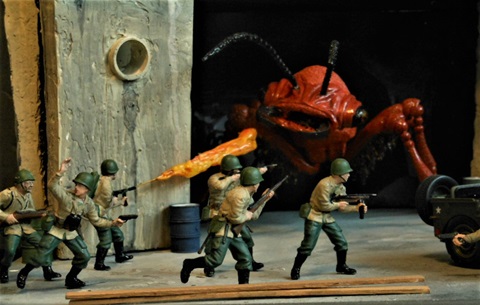
Panoramic shot of the whole diorama. Click on photo once for a larger image.

The People's Choice 2017 Award for this build that I won at the 2017 RIMA Annual Show.

The 2017 Judge's Top Pick Award for Most Imaginative Entry that I won at the 2017 RIMA Annual Show.
Latest comments
18.07 | 20:43
Speechless, And I am really speechless.
Incredible work. I am glad we could provide you with a grail
11.07 | 11:41
Great job down to the last detail!
10.07 | 16:36
Thank you, Addis, I estimate it took me around 100 hours to complete.
10.07 | 12:24
Terrific work...must've taken quite a while for you to complete...very good detail!!
Share this page