Classics Illustrated War Of The Worlds

Comic book art on which this diorama is based. The terrific artwork is by Lou Cameron.
Some of the happier memories of my youth was the time I spent reading comic books and my favorites of those were the Classics Illustrated series which were published in an irregular release cycle from 1941 to 1961. As their title suggests, these were classic novels presented in a comic book format in an effort expose unsuspecting young readers to the “best” that literature had to offer.
As I was a veracious reader quite early on, I needed no persuasion to read anything although the Classics Illustrated versions of my favorite science fiction novels had a tremendous appeal to me on many levels. My favorites were the works of Jules Verne and H.G. Wells, with his “War Of The Worlds” being #1 on my list with a very close second is “The Time Machine”.
I think I was in the third or fourth grade when I first purchased “The War Of The Worlds” (for 15 cents!!!) and I was enthralled by the story and artwork having never seen George Pal's 1953 cinematic classic. The actual novel is a bit of a haul for an eight year old so the comic presented the story in a less cumbersome (so to speak) version. I loved the design of the Martian war machines as illustrated by Lou Cameron so you can imagine my delight in coming across a very nice OOP resin kit from Lunar Models in roughly HO scale.
I managed to get my hands on the kit and decided to depart a bit from the kit which had a war machine standing over the Martian capsule with a few Martians in a sandy pit. I decided to go with the Classics Illustrated cover art which had a POV scene of a number of the Martian war machines attacking a British gun emplacement.

Here's a 'money' shot of the diorama where I attempt to copy the cover art of the comic book in all its glory.
For the base, I decided on a rocky field bisected by a small river to provide a little interest. I made the frame for the base out of some pine measuring 22” x 13” that I capped with a sheet of Masonite. Over this I put down a layer of 1” insulation foam board and I then gouged a rough cut down the center about 3” wide for the river bed. I placed a number of real stones and plaster castings on the surface. I poured a water simulation material from Woodland Scenics in the river bed after I sealed each end of the river bed with sheets of plastic affixed to the outside of the base with latex sealer to contain the fluid. I added small pebbles and sticks to the “water” before it cured to give a washed out appearance to the river banks. I finished up with small plant tufts, ground foam and sand to cover the entire surface resulting in a rocky field appearance. I added a 3D printed stone bridge that I downloaded from Thingaverse and printed on my trusty CR-10.
I also added a British WW1 Mark V tank kit from Airfix for the Martians machines to shoot at. Now before any purists out there say “tanks didn't exist at the time the novel takes place!”, yes, I know that but it's my diorama so there! Along with the tank, I found some 1/72 scale British WW1 artillery crews with horses and the like to populate the scene. I made small enclosures out of pebbles to represent hastily constructed battlements.
I used two different methods for constructing the explosions. The tank getting blown up was a method I had used in the past, primarily applying insulating foam in a can which I paint with clear yellow and orange paint to simulate a fiery blast. I carefully applied a bulbous deposit of the insulating foam on some scrap plastic (roughly four by five inches in size) into which I placed the Mark V tank at a cockeyed angle as if it were being blown into the air. Once the insulating foam cured, I painted it with clear yellow and orange Tamiya paint and then cut it free from the scrap plastic and placed it in the scene.
The tank getting blasted using the foam in a can technique.
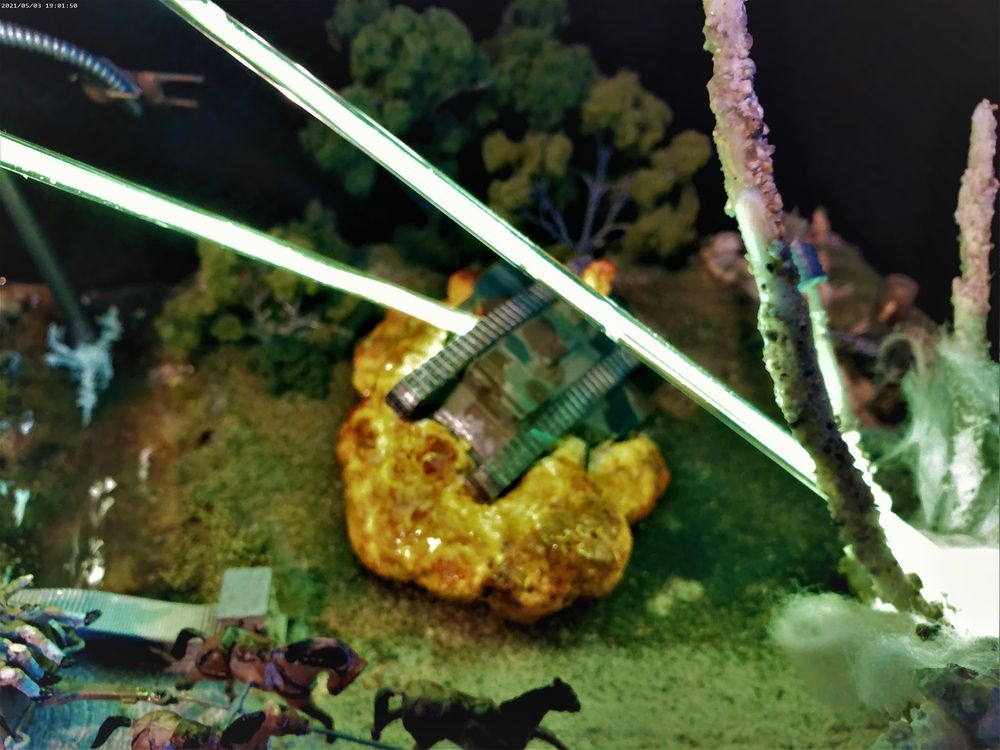
A gun emplacement getting creamed using the wire and hot glue armature. Careful if you try this method, that sh*t is HOT.

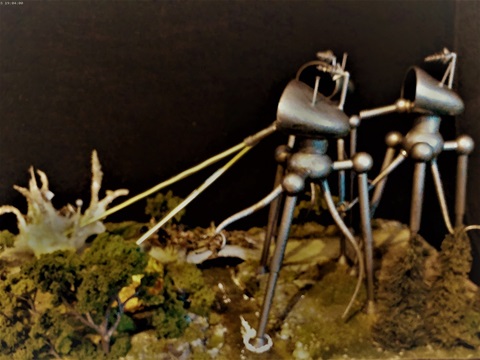
Close up of the Martian war machines doing their best to make toast out of the courageous British soldiers.
The other explosion used a 2” circular wire armature onto which a I hot glued seven spikes of varying lengths (think of a crown) to become debris trails. I built up the wires with hot glue that I sculpted into roughly conical shapes with my fingers (that stuff is HOT!). I followed with a heavy coat of carpenter's glue on each spire that I then sifted coarse sand, small sticks and pebbles to the sticky surface. Once the glue set, I inserted tufts of fiberglass as smoke billowing out of the blast area. I finished up with debris one would expect from a gun emplacement getting blown to smithereens such as pieces of artillery and other junk. This was my first using this technique and I am very pleased with how it turned out.
As I built the Martian war machines, it was necessary to bore holes in a number of pieces so that I could run wires for the ray gun effects between their LEDs and the power supply (batteries) in the base. Previously, I had stumbled across some so called LED filaments that are used in decorative lamps. They come in various colors and lengths so I opted for the fluorescent green 12” long filament that had leads at each end. Unfortunately, these things flopped around like a strand of wet spaghetti so I got my hands on some 1/8” ID glass tubing for support. I soldered an equal length of 1/32” brass rod to a filament end which served as a terminal back to the one of the wire leads in the ray gun's nozzle. This assembly was slid inside the glass rod taking care to use the filament to mask the brass rod and hopefully blocking it from view.

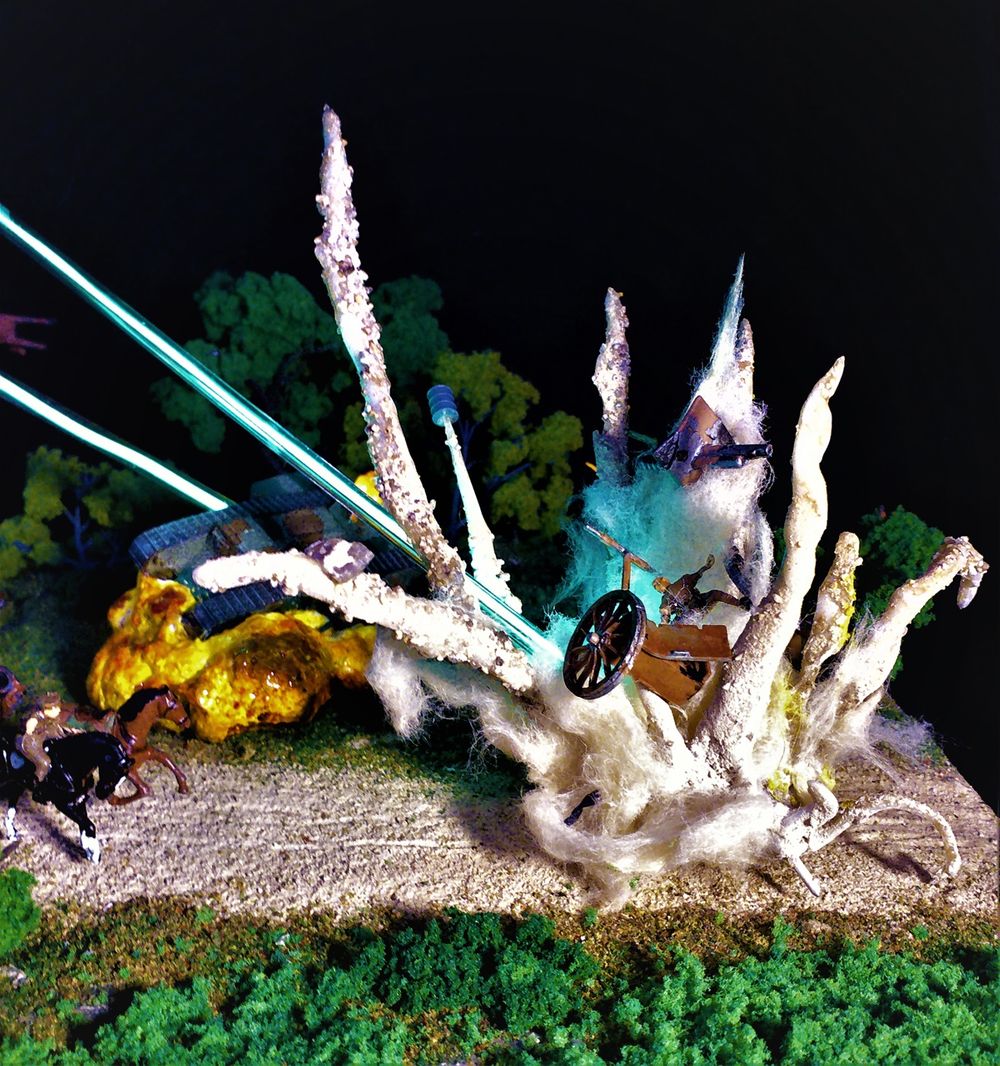
Three Martian war machines kicking some British ass. Note the guy hiding beneath the bridge while a brave gun crew race to join the battle raging above him.

A scene from the left side of the diorama showing the remnants of a British gun emplacement.
My old reliable pal, Stan Koziol at Starling Technologies, (https://www.starling-tech.com/index1.php?id=home) came up with a circuit that could power two of my war machine laser effects at the same time, having them fire intermittently which looks pretty cool if I do so say so myself. The circuit is powered by three AAA batteries all of which is mounted on the underside of the diorama's base.
Though I usually anchor larger objects in my dioramas with pegs or nails, I decided to make the Martian war machines secure with magnets that I embedded in two of the machines legs with corresponding magnets in the base. The third leg was used as a conduit for the ray gun LED power supply to run through the base to the batteries.
The completion of the scene was to add foliage (trees & shrubs) and the placement of the rest of the figures. If you look closely, you can see one soldier hiding under the bridge, a charred corpse near the blast site on the left side of the scene along with a dazed soldier stumbling away from the same area. This build up was probably my most time consuming diorama and I am generally happy with how it turned out. I think I would have handled it a bit differently if I were to try it again but that is only natural for me since I'm always learning as I go along. 12/12/2021

Some clip art from the original 1955 comic by Lou Cameron. Mr. Cameron also did the artwork for my other Classics Illustrated favorite "The Time Machine".
A shot from the rear of the diorama reflecting the comic art at the left (sorta).
A brief video (~ 2 mins) showing the Martian machines in action with deadly rays "killing everything that moves!" Sorry, no sound effects this time but I added a musical score that, I think, fits the scene very nicely.
Comments
Ralph Farmer
14.12.2021 18:10
Really a wonderful - super - recreation. Congratulations and thanks for sharing.
Robert Houghton
13.12.2021 00:48
Great Job!!
Latest comments
18.07 | 20:43
Speechless, And I am really speechless.
Incredible work. I am glad we could provide you with a grail
11.07 | 11:41
Great job down to the last detail!
10.07 | 16:36
Thank you, Addis, I estimate it took me around 100 hours to complete.
10.07 | 12:24
Terrific work...must've taken quite a while for you to complete...very good detail!!
Share this page